How to Create a Looping GIF With ChatGPT and Turn It Into an MP4 With Canva
Have you ever seen a little animation on a website and wondered how difficult it would be to create one yourself?
Maybe it’s a product slowly rotating, a butterfly fluttering its wings, or steam gently rising from a cup of coffee.
Well, here’s something fun!
You can now create animated GIFs using ChatGPT, and you don’t need to be a graphic designer to try it! 😊
I recently experimented with animating one of my digital product covers. That worked so well that I decided to try something different.
This time, I wanted to make steam rise from a cup of coffee.
Let me show you how!
Step 1: Start With a Simple Image
First, you’ll need an image you’d like to animate.

For my experiment, I used a white coffee cup filled with freshly brewed coffee, sitting on a saucer against a plain white background.
I actually created the original coffee cup image using ChatGPT, but you can upload your own picture instead.
Tip: Start with something simple. Images with clean backgrounds and one main subject are often easier to animate.
Step 2: Tell ChatGPT What You Want to Move
Here’s where the fun begins!
Upload your image to ChatGPT and explain exactly what you want the animation to do.
For my coffee cup, I wanted the cup and saucer to remain perfectly still while the steam moved.
My first attempt produced steam that was a little too faint.
So I asked ChatGPT to make it thicker and more visible.
That made a noticeable difference!
Step 3: Copy My Coffee Cup Animation Prompt
Here’s the updated prompt you can try yourself.
Copy and paste this into ChatGPT after uploading your coffee cup image:
Create a realistic, seamlessly looping animated GIF using my uploaded coffee cup image.
Show two or three clearly visible, soft white-gray wisps of steam continuously rising from the hot coffee.
The steam should form beautiful, flowing S-shaped curls that gently twist, drift upward, and gradually fade into the air.
Make the steam slightly thicker and more visible than ordinary coffee steam, while keeping it soft, translucent, and natural-looking.
Keep the coffee cup, saucer, coffee surface, and clean white background completely stationary. Only the steam should move.
Use 16 animation frames over approximately 4 seconds. Make the movement smooth and seamless, with no sudden jumps when the loop repeats.
After creating the animated GIF, also produce an MP4 video approximately 12 seconds long, repeating the animation three times.
Maintain the original image proportions. No text, music, or additional objects.
You can change the wording to suit almost any image.
The important thing is to tell ChatGPT what should move, what should stay still, and how the animation should repeat.
Step 4: Check Your Animated GIF
Once ChatGPT has finished, examine the result.
An animated GIF is made from a series of individual images called frames.
When those frames play in sequence, they create the illusion of movement.
For my coffee cup animation, I requested 16 frames spread over approximately four seconds.

That creates a gentle movement rather than a sudden burst of steam.
You might initially see a grid of frames as a preview. Make sure you save the finished animated GIF, not just a static picture of those frames.
And if you’re not happy with the result?
Simply ask ChatGPT to make adjustments!
Step 5: Create an MP4 Video
Now suppose you want to share your animation on Facebook or Instagram.
An MP4 video is often a better option because video uploads are more widely supported than animated GIF uploads.
You can ask ChatGPT to convert your finished GIF into an MP4 file, although direct video conversion isn’t available in every ChatGPT session.
Here’s how I turned my GIF into an MP4 using Canva:
-
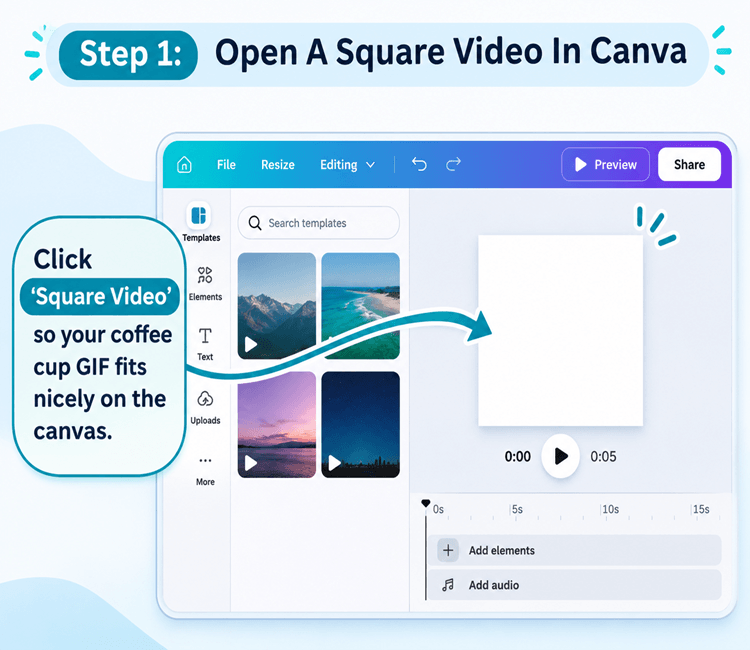
Open a Square Video design in Canva.
-
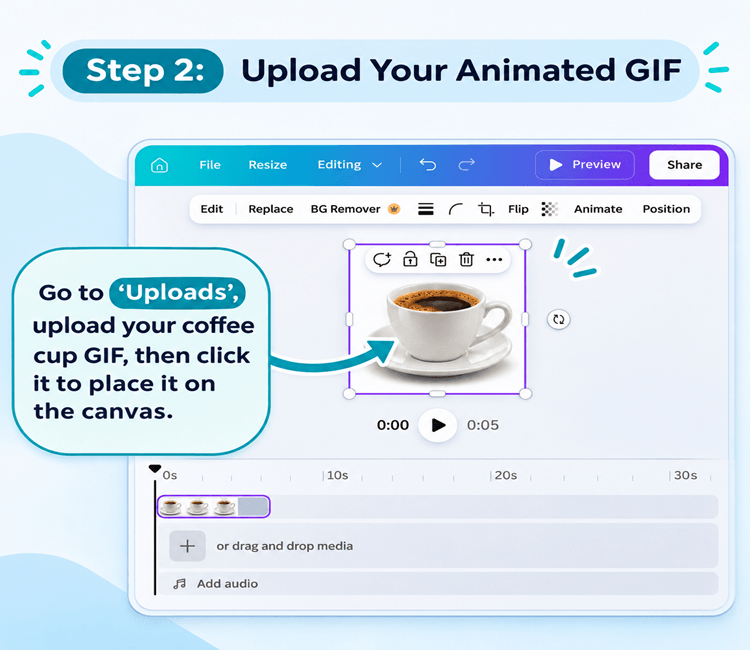
Upload your animated GIF and check that it plays.
-
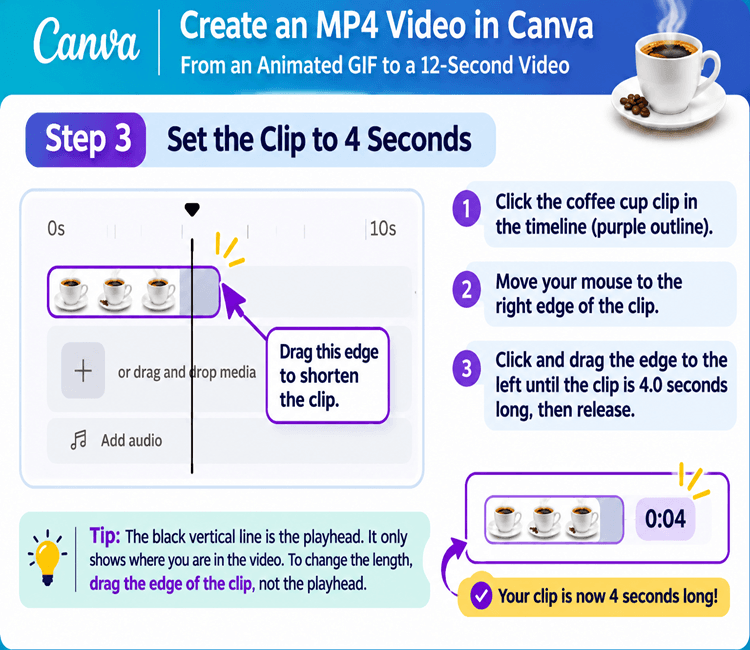
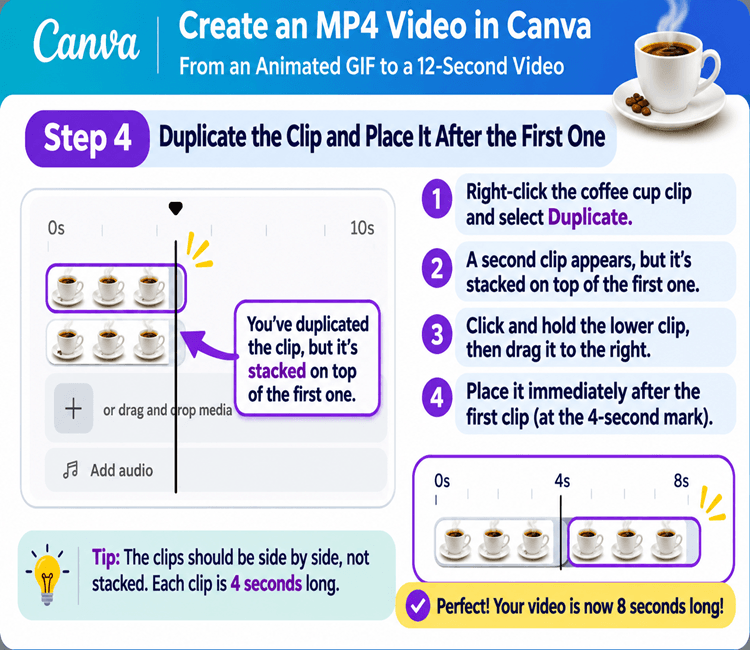
Shorten the clip to four seconds.
-
Duplicate the clip and move the copy so it starts immediately after the first.
-
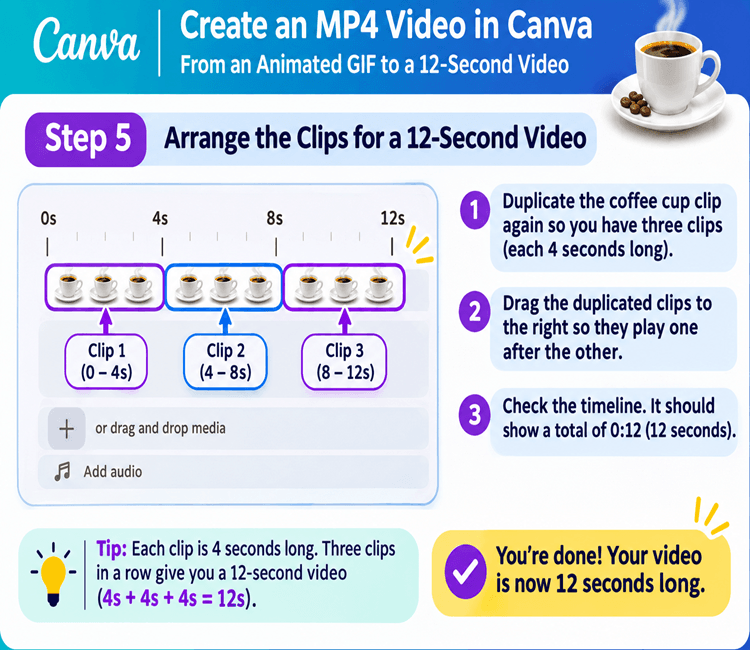
Duplicate it again and position the third clip to create a 12-second video.
-
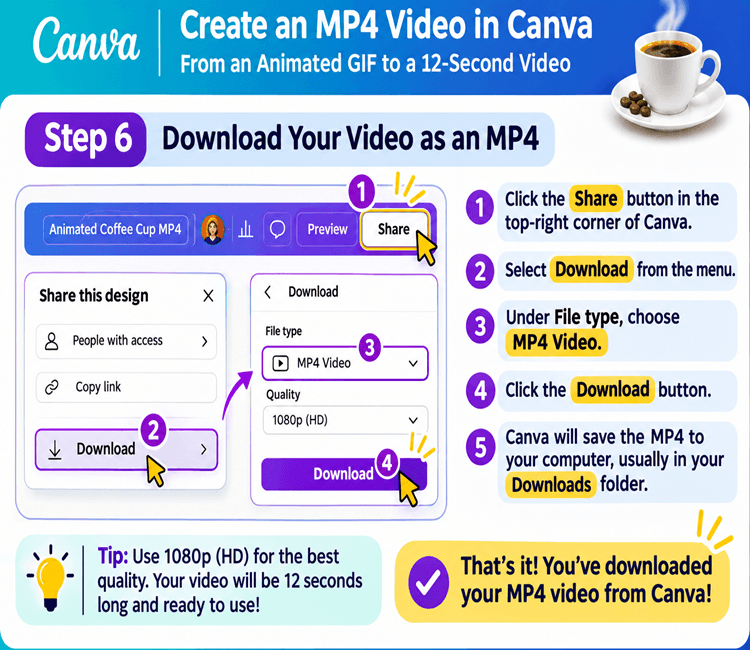
Download your MP4 using Share → Download → MP4 Video.
That’s it!
You now have a video version of your animation that you can use for social media.
Step 6: Add Your GIF to WordPress
Want to display your animation on your blog?
Open your WordPress editor, add an Image block, and upload your GIF.
Select the original animated file rather than a WordPress-generated thumbnail, which may display only a still image.
Preview your post to make sure the animation plays correctly.
Also, keep an eye on file size. Large GIFs can slow down your pages, so an MP4 may sometimes be the better choice.
What Else Could You Animate?
Once you’ve tried one animation, you’ll probably think of all sorts of possibilities!
You could make a digital product rotate, create a softly glowing button, animate a floating balloon, or add gentle movement to an illustration.
And you don’t need to make everything spin or bounce!
Sometimes a little movement is all it takes to make an ordinary image more interesting.
One final thing: ChatGPT’s GIF creation feature is still being rolled out, so availability may vary between accounts.
Why not give it a try with one of your own images?
I’d love to hear what you create!
Happy animating! 😊